
Free YouTube Promotion Rate Calculator for Influencers
Looking to monetize your YouTube channel but unsure how much to charge for promotions or sponsorship...

Ryan McCain

Your WordPress website is the digital face of your business. It welcomes customers, showcases your brand, and drives revenue. But if it’s built on WordPress, it’s also a glowing target for attackers. Every day, automated bots and opportunistic hackers crawl the internet, looking for outdated plugins, weak passwords, exposed configuration files, or poorly configured servers. One small oversight by a website owner can lead to disaster — your site defaced, blacklisted by Google, or silently hijacked to serve malware, phishing pages, or spam links.
At Norzer, we’ve secured hundreds of WordPress sites for small businesses across the U.S. We’ve seen the damage that can happen when things go wrong. Clients have lost weeks of traffic, thousands in revenue, and the trust of customers over a single preventable flaw.
This isn’t a beginner’s checklist telling you to install a security plugin and call it a day. It’s a detailed guide for WordPress site owners, freelancers, developers, and digital agency owners who want to level up their security skills, whether you’re managing one site or dozens of client WordPress installations that need to stay secure, fast, and off the radar of automated attacks.
We assume you’re comfortable with tasks like installing plugins, editing wp-config.php, or working inside your hosting control panel. When needed, we’ll link to deeper tutorials, but the focus here is on practical steps you can take right now to make WordPress more secure.
The goal is to protect your website by turning it into something attackers will skip. You don’t need a perfect setup—just enough hardening to avoid being the easy target. You don’t need a perfect setup; you just need to avoid being the low-hanging fruit. Hackers and bots are looking for easy targets. If your site is even slightly more secure than the next one, they’ll move on.
Let’s be clear. No website is completely secure without any security issues. The only truly safe computer is turned off, wiped clean, unplugged, and buried in a landfill, and even then, someone might dig it up. The point isn’t perfection. It’s about not being the easy target. Most attacks aren’t personal. They’re automated. Bots are scanning the internet 24/7 for known patterns like default login URLs, outdated software, or exposed files. If your site matches one of those patterns, it goes on a hit list, and the attacks begin — brute-force logins, malicious uploads, or redirects to sketchy sites.
The good news is that most attackers are lazy. They’re not elite hackers. They’re just looking for sites with open doors. We’ve seen sites hacked because of a single weak password, an old FTP account that was never deleted, or a plugin that hadn’t been updated in years. You don’t have to build a fortress. Just patch the obvious stuff, layer your defenses, and stop being the low-hanging fruit.
Think of it like home security. A few good locks, a motion light, and a camera will make most burglars move on to the neighbor who left their door open and keys in the ignition.
This guide will walk you through real-world hardening from the server up, based on the same process we use at Norzer. Some steps can break things if done wrong, so make sure you have a full backup, both files and the WordPress database, so you can roll back if needed.
Whether you’re a solo business owner, a freelancer with a handful of client sites, or a full-blown agency, this is your roadmap for locking down WordPress, protecting your brand, and offering high-value security services to your clients.
WordPress now powers over 40% of the internet—but that popularity comes with a target on its back. What once was an occasional brute force annoyance has evolved into a nonstop arms race of automated scans, zero-day exploits, and plugin vulnerabilities that can take down your site before you even know it’s happening. Attackers aren’t just going after big brands anymore—they’re actively targeting small business websites that fly under the radar, knowing they’re often poorly maintained or relying on default settings.
According to the recent Wordfence WordPress Security Report, the threat landscape is only getting worse. If you’re heading into this year without a hardened WordPress setup, you’re not just taking a risk, you’re leaving the door wide open. Here’s what every site owner should know heading into 2026
Meanwhile, attack patterns are shifting:
What this means for you:
Modern WordPress security isn’t just about installing a Web Application Firewall (WAF) plugin and protecting against brute-force attacks—it’s about staying ahead of plugin and security vulnerabilities, removing unused code, and layering your defenses. Bots and bad actors are adapting. If your defenses haven’t, you’re likely already on a list.
Following the hardening strategies in this guide will put your WordPress site ahead of the curve and more secure than 99% of the WordPress installs out there! Remember to always back things up!
Before we dive into the technical weeds, let’s establish the principles that guide every security audit we conduct at Norzer:
At Norzer, we rely on Solid Security Pro for every client site. It’s an all-in-one powerhouse that consolidates the most important features you’d normally piece together from multiple WordPress security plugins like brute-force protection, file change detection, two-factor authentication (2FA), and more. into a single, streamlined tool. Instead of cobbling together half a dozen security plugins such as Wordfence for scans, WP 2FA for two-factor authentication, and WP Activity Log for logging, Solid Security Pro keeps things lean without sacrificing coverage. Its intuitive dashboard saves time, and its features are battle-tested against the kinds of attacks we see every week: brute-force barrages, malicious uploads, and quiet script injections. That said, not everyone likes relying on plugins, and we get that. Throughout this guide, we’ll also show you how to manually harden your site or use alternative tools because there is more than one way to secure a site.
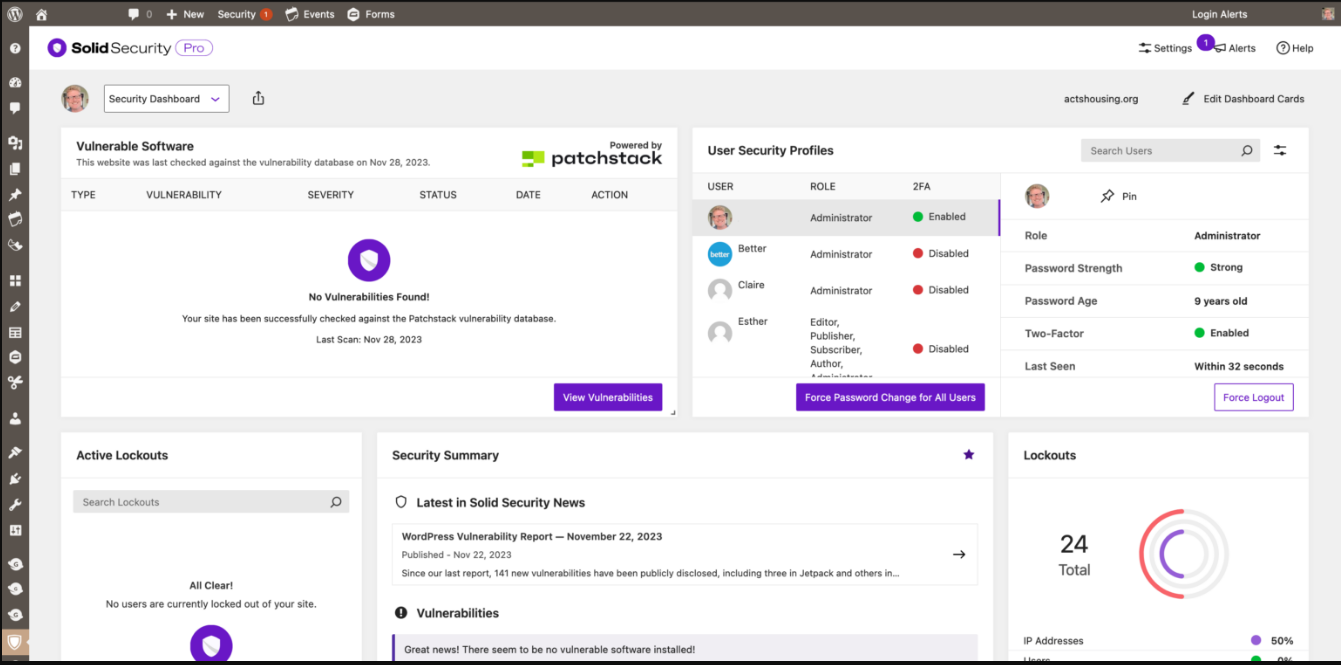
Pro tip: We’re also starting to test out WP Security Ninja, which is showing a lot of promise. The developers have been incredibly responsive to feedback, frequently rolling out updates and adding new features that make it a compelling alternative or complement to existing security setups. Early results look strong, and we’ll be sharing more as we continue putting it through real-world scenarios. As of this writing, you can still get WP Security Ninja for a one-time payment lifetime deal (LTD) over at AppSumo. There are no monthly fees if you take advantage of the LTD on AppSumo while it lasts. WP Security Ninja can do most everything Solid Security Pro can do, but also has its unique set of features. Both are great products!
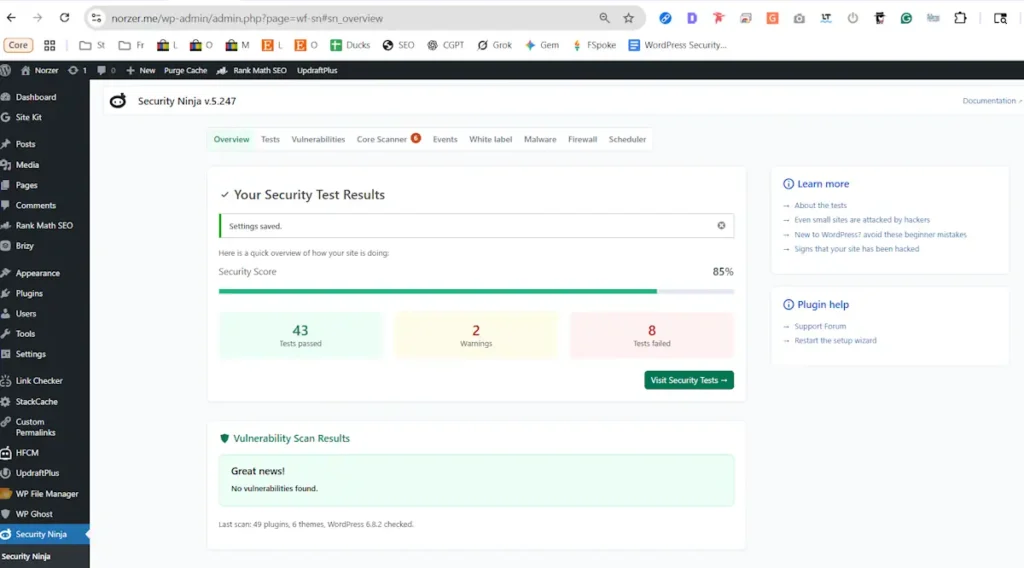
Just for transparency: I don’t work for Solid Security or WP Security Ninja, but if you purchase them through our affiliate links, I’ll get a small commission. It doesn’t cost you anything extra, and it helps support guides like this. Think of it as a way to say thanks if you’ve found this helpful.
Most WordPress security advice focuses on the application layer—plugins, themes, and dashboard settings. But many hacks don’t start inside WordPress; they exploit vulnerabilities at the hosting, server, or domain level. Skip these foundational steps, and you’re leaving the back door wide open, no matter how many WordPress security plugins you’ve installed. True security starts beneath the dashboard. At Norzer, every security audit begins here, informed by real cleanup jobs where server-level oversights led to disaster, like a client whose site was hijacked through a forgotten cPanel login, costing them weeks of downtime and thousands in lost sales.
Before hardening your site, take the time to document how everything is currently set up. Think of this as a pre-flight checklist. If anything breaks during security changes, you’ll have a clear reference point to track down the cause. Skipping this step is one of the most common mistakes I see during cleanups.
Start by capturing your WordPress environment:
Also note:
This baseline isn’t just about peace of mind, it’s an essential recovery tool. During a recent client cleanup, a misconfigured WAF rule started blocking admin logins across the board. Thanks to a screen recording we took before changes were made, we quickly spotted the cause and rolled it back in minutes instead of spending hours chasing red herrings.
Pro Tip: Store your baseline screenshots, video, and notes offline or in a folder labeled with your site name and date, and password-protect it. Update it quarterly or after major changes.
Your hosting account is the master key to your site—files, databases, email, and the server stack. If it’s compromised, no WordPress plugin can save you. Here’s how to secure it:
Delete unused accounts immediately and rotate passwords every 30 days for active ones, especially if they provide backend or file-level access to WordPress installations.
Pro Tip: Set a recurring calendar reminder to remind you to change passwords and to clean out old contractor access—future you will thank you when there’s no mystery account lingering.
Proactive monitoring is like having a security guard patrolling your site—it catches problems before they escalate. Here’s how to stay ahead:
Uptime monitoring: If your site goes down due to a DDoS attack or server exploit, how long until you notice? Most small business owners don’t know until a customer calls or Google penalizes their rankings. Use Uptime Robot’s free plan to ping your site every 5 minutes, sending alerts via email or Slack if it’s offline. We set this up for a client’s e-commerce site, catching a server crash before it cost them a day’s sales.
Visual change monitoring: Just because your website is up doesn’t mean everything’s fine. Attackers often deface pages, inject shady links, or quietly swap out banners and images—without taking the site offline. Tools like ChangeTower or Visualping monitor for visual or content changes and can alert you when something doesn’t look right. We once caught a client’s homepage quietly redirecting users to a questionable casino offer. The uptime monitor said “all clear,†but the content had been tampered with. Pro tip: Have alerts sent to your phone for instant awareness.
External scans: Internal scanners like Solid Security Pro are critical, but external tools see your site as Google or attackers do. Manually run weekly scans with Sucuri SiteCheck (free) to detect cloaked scripts, malware, or spam links that plugins might miss. We’ve found injected JavaScript on client sites that only external scanners caught because it was hidden from logged-in admins. Use both internal and external scanners for comprehensive coverage, like two security cameras capturing different angles.
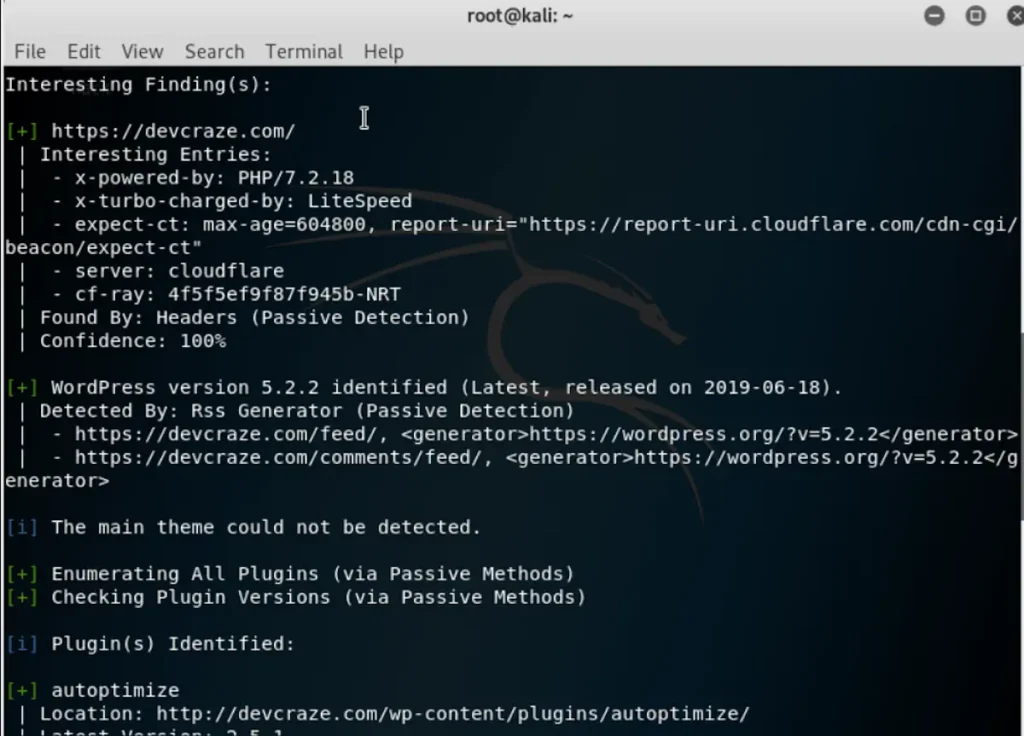
Penetration Testing for Advanced Validation: External scans are a great start, but penetration testing takes it further by simulating real-world attacks to uncover hidden vulnerabilities. Free tools like WPScan (available via command line or as a hosted service) can scan for known WordPress vulnerabilities, such as outdated plugins or weak configurations. For a deeper dive, consider hiring an ethical hacker through platforms like Upwork or Patchstack, which offer professional penetration testing tailored to WordPress. These tests validate your hardening efforts and catch issues scanners might miss, like logic flaws or misconfigured permissions. Budget-conscious? Start with WPScan’s free CLI tool and review its reports monthly, but note that professional testing is ideal for high-value sites like e-commerce stores. We’ve helped clients avoid breaches by identifying obscure vulnerabilities through pentests that automated scans overlooked.
Access raw logs: Server logs like access.log, error.log, or domain.com.log (found in your hosting dashboard or /var/log/) reveal suspicious activity, like repeated hits to wp-login.php, unusual POST requests, or IPs from unexpected countries. Verify logging is enabled now. Don’t wait for a hack. If your host doesn’t offer logs, ask them to enable it or check .htaccess options. We once traced a client’s breach to a single IP hammering their login page, found in the raw logs.
Install WP-CLI: If your host provides shell access, install WP-CLI, a command-line tool for managing WordPress. It’s a lifesaver when wp-admin is locked or a plugin breaks your dashboard. You can reset passwords, deactivate rogue plugins, or create new admin accounts from the server. I’ve used it to rescue client sites where a faulty update bricked the dashboard, saving hours of manual recovery. Pro tip: Even if you’re not a command-line expert, keep WP-CLI installed for copy-paste commands from tutorials like those on ThemeIsle.
ClamAV for Linux servers: If you manage your own Linux server, install ClamAV, an open-source antivirus that scans for malware, rootkits, and suspicious scripts outside WordPress. It’s lightweight (e.g., apt install clamav on Ubuntu) and catches system-level threats that plugins miss. Set it to run daily or weekly via a cron job and email results to avoid manual checks. We caught a rootkit on a client’s server this way, preventing a full compromise. Check out the pretty solid guide over at LiquidWeb on installing and configuring ClamAV.
If you manage your own server, tightening PHP settings is like locking the server’s back door. In your php.ini file:
Catching a hack early can save your rankings and reputation. Here’s how to stay vigilant:
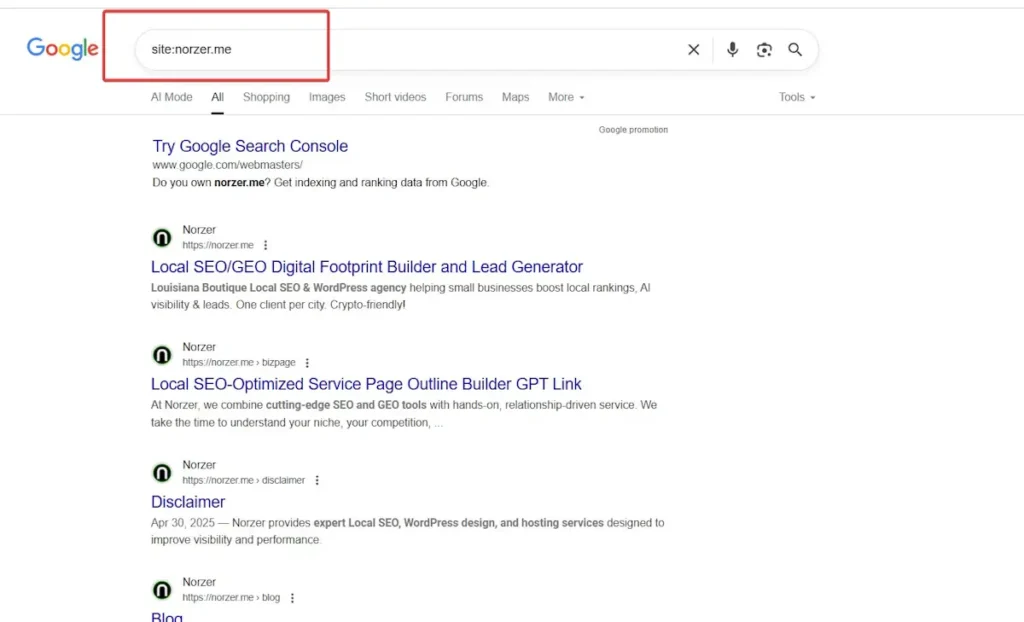
Monthly Google search: Run “site:yourdomain.com” in the Google search bar to see what Google has indexed. Strange results, like Japanese text, pharmaceutical spam, or casino pages, all signal a hack. We’ve seen clients discover breaches this way after Google penalized their rankings, dropping them from page one to obscurity. Set a calendar reminder to check monthly, as I used to forget until it became a habit. If you haven’t noticed, I use Google Calendar reminders for everything.
Google Search Console (GSC): This free tool takes 5 minutes to set up and alerts you to malware, spam, or ranking drops. It’s your early warning system for issues that hurt SEO and customer trust. A client ignored a GSC alert about malware, only to find their site blacklisted—don’t make that mistake.
Domain WHOIS and renewal: Ensure your domain is locked, private, and set to auto-renew with 2FA on your registrar account (e.g., Namecheap, GoDaddy). A compromised registrar can take your site offline or transfer it away. I’ve seen businesses lose domains to hijackers, costing thousands in recovery fees and lost traffic.
Even Cloudflare’s free plan is a game-changer: DDoS protection, a global CDN, HTTPS enforcement, bot filtering, and rate limiting. It stops junk traffic before it hits your WordPress install, reducing server load and boosting speed. We set up Cloudflare for a client during a DDoS attack, and their site stayed online while competitors crashed during a Black Friday sale a few years back.
Pro Tip: Enable “Under Attack Mode†during active exploits—a powerful security feature that forces a JavaScript challenge for all traffic, filtering out bots before they ever hit your server. Be cautious with overlapping features (e.g., Cloudflare’s WAF and Solid Security Pro’s firewall) to avoid false positives or login issues. My preference is to let Cloudflare handle network-level threats (bad IPs, DDoS, etc.) and Solid Security Pro manage app-level security (file changes, logins, etc.).
There is a great paid on-demand training course called the Beginner’s Guide to Cloudflare services for Agencies here. You can also reference this handy free PDF called the Cloudflare WAF Rules for WordPress.
Cloudflare is powerful, but its settings can sometimes backfire if not configured carefully:
What to do:
Starting with default security settings, then layering in stricter policies over time, is usually safer than enabling everything at once.
Want to get even more out of Cloudflare? Consider upgrading to their Pro plan for additional security features like advanced WAF rules, better bot protection, and more control over how traffic is filtered.
While Cloudflare protects most small business sites from DDoS out of the box, high-traffic sites, online stores, and SaaS platforms may need additional layers.
Here’s how to take it further:
Pro Tip: Monitor Cloudflare analytics for unusual traffic spikes to catch DDoS attempts early.
Now that the foundation is locked down, it’s time to tighten up WordPress itself. Even with a rock-solid server setup, most real-world attacks still happen inside WordPress through weak user accounts, outdated plugins, and default settings that were never changed. This next section focuses on the core of your site: the dashboard, the users, and the plugins that power everything. If the first half of this guide kept the bad guys outside the walls, this part makes sure they can’t get in through the front door.
With the server locked down, let’s secure WordPress itself, where most attacks target weak user accounts, outdated plugins, or default settings. Bots hammer WordPress login pages, exploit plugin vulnerabilities, and probe for misconfigurations. This section covers the exact steps we take at Norzer to secure the WordPress dashboard, based on years of cleaning up hacked sites.
WordPress Users are often the weakest link. A single compromised account can open the door to disaster. Here’s how to lock it down:
<IfModule mod_authz_core.c>
    Require ip 123.45.67.89
    Require ip 98.76.54.32
</IfModule>

<IfModule !mod_authz_core.c>
    Order deny,allow
    Deny from all
    Allow from 123.45.67.89
    Allow from 98.76.54.32
</IfModule>
This .htaccess snippet restricts access to a directory, such as /wp-admin/, so only specific IP addresses can reach it. The first block applies if the Apache module mod_authz_core is enabled, which is used in Apache 2.4 and newer. Here, Require ip allows only the listed IP addresses, in this example, 123.45.67.89 and 98.76.54.32, while all others are blocked by default. The second block is for older servers running Apache 2.2 or earlier, using the Order deny,allow syntax. In that case, Deny from all blocks everyone, and Allow from makes exceptions for the specified IP addresses. You can also allow IP ranges or use CIDR notation for broader access. For example, Require ip 123.45.67.0/24 (or Allow from 123.45.67.0/24 on older Apache) would grant access to all IPs 123.45.67.0 through 123.45.67.255. This dual-block format ensures the restriction works on both modern and legacy Apache configurations.
Test carefully to avoid lockouts—see our YouTube walkthrough for a safe setup. For dynamic IPs (e.g., travel), you can update firewall rules via SSH in under a minute. This stopped 90% of brute-force attempts for a client’s blog by ensuring only trusted IPs had access to your WordPress admin area.
Alternatively, you can use a .htpasswd file to password protect the directory as explained here.
Disable open registration: Unless you run a membership site or forum, uncheck “Anyone can register†in Settings > General. Open registration invites bot accounts or spam users. If registration is needed, set the default role to Subscriber and use anti-spam plugins like WPForms or CleanTalk. We’ve seen clients’ sites flooded with fake users because this was left enabled.
Your WordPress login page is ground zero for automated attacks. Bots hammer wp-login.php with thousands of username/password combos, looking for an easy win. Here’s how to shut them down:
Disable login hints: WordPress’s default error messages (“invalid username,†“incorrect passwordâ€) help attackers guess valid users. Solid Security Pro disables these with one toggle, replacing them with generic messages like “Login failed.†Pro Tip: Generic errors frustrate bots without tipping them off.
| Don’t leave your WordPress site exposed. Contact Norzer today to get a personalized security audit and hardening plan to protect your site, keep hackers out, and safeguard your SEO rankings. |
If attackers bypass login defenses, they’ll target the file system, injecting malicious scripts or editing core files. Here’s how to lock it down:
Disable file editing: WordPress allows admins to edit theme/plugin files from the dashboard—convenient but dangerous. If an admin account is compromised, attackers can drop malware in seconds. Disable it with Solid Security Pro or add to wp-config.php:
define('DISALLOW_FILE_EDIT', true);Pro Tip: Attackers can still upload file manager plugins, so monitor plugin installs with Solid Security Pro.
Disable XML-RPC: This outdated feature enables remote access but is exploited for brute-force and pingback attacks. Solid Security Pro can disable it entirely or block specific methods. Alternatively, use a plugin like Disable XML-RPC or add the rule to .htaccess:
<Files xmlrpc.php>

  Order Allow,Deny

  Deny from all

</Files>
Pro tip: We disabled XML-RPC for a client’s blog, stopping a pingback attack that was slowing their site.
Prevent PHP execution: The /wp-content/uploads/ folder is writable by default, making it a favorite for malicious scripts. Add this to the .htaccess in that folder:
<Files *.php>

  deny from all

</Files>
Apply to /wp-includes/ and other writable folders. We caught a client’s site with a malicious PHP file in /uploads/—this rule would’ve blocked it. Remember, test, test, test, test! Don’t assume these changes don’t break something!
Block directory browsing: Without an index file, folders like /wp-content/uploads/ may expose your structure, revealing plugin names or sensitive files. Solid Security Pro blocks this, or add to .htaccess:
Options -IndexesDisable debugging: Debug mode can leak file paths, plugin names, or database details. In wp-config.php, set:
define('WP_DEBUG', false);

define('WP_DEBUG_DISPLAY', false);
Pro Tip: Only enable debugging on a staging site, never live, unless you are actively troubleshooting an issue for a very short period of time. Set a calendar reminder to disable it when done because you will forget.
Outdated plugins are the #1 entry point for WordPress hacks and a major security risk. Attackers exploit known vulnerabilities listed in databases like CVE or WPScan. Don’t be the low-hanging fruit:
Enable auto-updates: Turn on minor core and plugin updates in the dashboard (Dashboard > Updates):
Pro tip: WPScan maintains a comprehensive database of WordPress vulnerabilities.
Your database is the heart of WordPress, storing posts, pages, users, and settings. A breach here is catastrophic:
The WordPress REST API (/wp-json/) powers modern features but is a growing target for data theft or unauthorized access:
Security isn’t just about blocking attacks—it’s about staying off the radar. Bots scan for WordPress fingerprints (default paths, version numbers) to target vulnerabilities. Break the pattern, and you dodge their scripts:
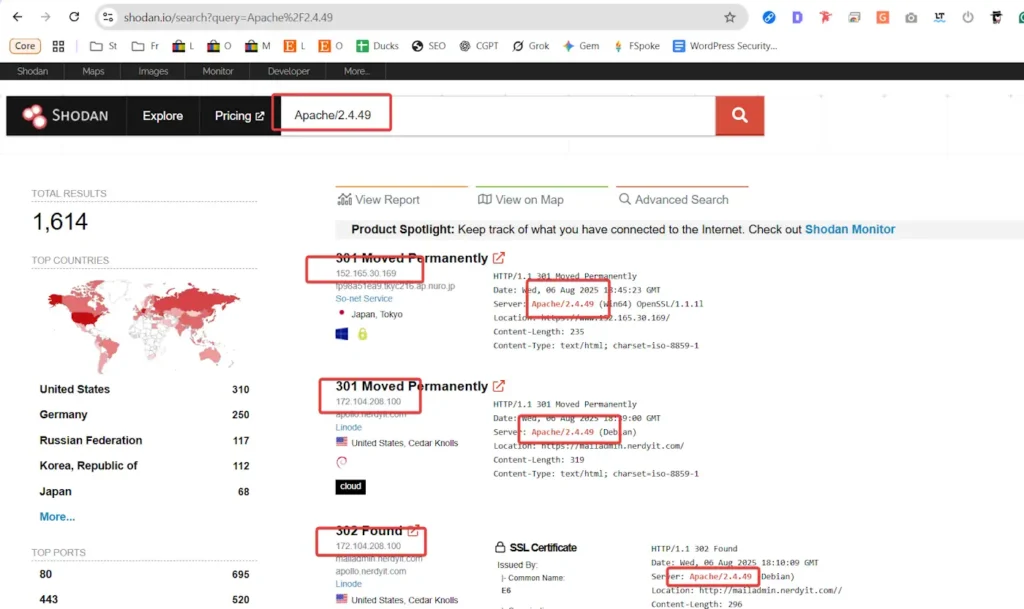
These often-ignored steps can make or break your defense:
Security headers are an often-overlooked but powerful way to harden your WordPress site against common web attacks. These are directives you can set in .htaccess or through a security plugin to control how browsers handle your site’s content. Examples include Content-Security-Policy (CSP) for blocking malicious scripts, X-Frame-Options to prevent clickjacking, X-Content-Type-Options to stop MIME type sniffing, Referrer-Policy to limit how much information is sent in the HTTP referrer, and Strict-Transport-Security (HSTS) to enforce HTTPS connections. When configured properly, these headers can greatly reduce your site’s exposure to cross-site scripting (XSS), code injection, and man-in-the-middle attacks.
One of the most impactful is Content-Security-Policy. It lets you define which domains your site is allowed to load resources from, effectively blocking unauthorized scripts or styles. For example:
Header set Content-Security-Policy "default-src 'self'; script-src 'self' https://trusted.cdn.com;"
Because CSP is strict, start with Content-Security-Policy-Report-Only mode to see what would be blocked without actually breaking anything. This is critical for sites using third-party services like Stripe or Google Analytics. You can test and refine your setup using tools like the Mozilla Observatory or SecurityHeaders.com.
Other headers are easier to implement but just as important. X-Frame-Options "SAMEORIGIN" prevents your site from being embedded in iframes on other domains, blocking clickjacking attempts. X-Content-Type-Options "nosniff" tells browsers not to guess file types, which can prevent certain exploits. Referrer-Policy "strict-origin-when-cross-origin" helps protect sensitive URL data. And with HSTS, you can force browsers to always connect over HTTPS, ensuring encrypted communication after the first visit.
These changes can have a big impact on site functionality, so test carefully before deploying them on your live site. Some headers, especially CSP and HSTS, can unintentionally block legitimate resources or cause service disruptions if misconfigured. Always apply them in a staging environment first, and secure that staging site as well—it can be just as vulnerable as your production site if left open.
Once you’re confident your headers work as intended, push the changes live and make a note to review them periodically. Browser standards and best practices evolve, so security settings that are ideal today might need adjustments in the future. This layered approach, combined with other WordPress security measures, will make your site a much tougher target for attackers.
The threat landscape evolves, and the future brings new challenges:
This could be a blog post in itself, but just know even the best defenses can fail. If your site is hacked:
If you’re running WordPress Multisite, you’re managing a network of potential vulnerabilities, not just a single site. One weak sub-site, outdated plugin, or rogue admin can open the door for attackers to compromise the whole network.
Here’s how to lock it down without losing control.
By default, sub-site admins can’t install plugins or themes, and you should keep it that way. Don’t elevate privileges unless absolutely necessary.
What to do:
Pro Tip: Treat each sub-site like an untrusted tenant on a shared server. One bad password or outdated plugin can compromise everything.
Security logs and alerts should be monitored from the top level of the network, not just on individual sub-sites.
Tools that help:
Optional: Install a custom plugin to log sub-site logins and alert you if unfamiliar IPs access sensitive areas.
Multisite installs introduce unique vectors, like enumeration of site IDs, open registration exploits, or plugin path exposure.
Recommendations:
Disable new site registration unless needed:
define( ‘WP_ALLOW_MULTISITE’, true );
define( ‘MULTISITE’, true );
define( ‘SUBDOMAIN_INSTALL’, false );
define( ‘DOMAIN_CURRENT_SITE’, ‘example.com’ );
define( ‘ADMIN_EMAIL’, ‘you@example.com’ );
define( ‘ALLOW_UNFILTERED_UPLOADS’, false ); // Bonus protection
Security isn’t just about protection—it boosts SEO and performance:
For most small business websites, running a full WordPress security audit every 3 to 6 months is a solid baseline. However, if your site handles sensitive data, customer logins, or frequent content updates—or if you’re running multiple client sites—you should audit much more often, ideally monthly. You should also perform an audit immediately after major changes like installing new plugins, migrating to a new host, or switching themes. Security isn’t a “set it and forget it†job. Things like plugin updates, server changes, or forgotten user accounts can quietly introduce new risks over time. Proactive audits help you catch those changes before attackers do.
Yes, but it depends on your comfort level. Many critical security improvements can be done manually—like configuring your .htaccess file to block access to sensitive areas, restricting login access by IP, disabling file editing in wp-config.php, and managing file permissions properly via FTP. You can also harden PHP, scan your server logs, or set up external monitoring tools—all without touching a plugin. That said, plugins save time and reduce human error. Tools like Solid Security Pro and WP Security Ninja consolidate dozens of best practices into a dashboard you can manage without touching code. For most website owners, a hybrid approach works best: manual hardening for hosting-level security plus a solid plugin for automation and monitoring.
The biggest vulnerabilities usually come from human error and outdated components. The top risks include:
wp_)Not if you choose wisely. The myth that all security plugins slow down WordPress comes from bloated or poorly built tools, or from stacking too many plugins with overlapping features. A lean, well-coded plugin like Solid Security Pro or WP Security Ninja is designed to be lightweight and performance-aware. These tools disable dangerous features, restrict access, log changes, and block bad traffic efficiently—without bloating your load times. In fact, many security plugins actually help your performance by filtering out bot traffic, spam requests, and brute-force login attempts that eat up server resources. That said, always avoid using multiple security plugins that do the same job (like multiple firewalls or 2FA tools), and regularly audit which features you have enabled.
Not if you choose wisely. The myth that all security plugins slow down WordPress comes from bloated or poorly built tools, or from stacking too many plugins with overlapping features. A lean, well-coded plugin like Solid Security Pro or WP Security Ninja is designed to be lightweight and performance-aware. These tools disable dangerous features, restrict access, log changes, and block bad traffic efficiently—without bloating your load times. In fact, many security plugins actually help your performance by filtering out bot traffic, spam requests, and brute-force login attempts that eat up server resources. That said, always avoid using multiple security plugins that do the same job (like multiple firewalls or 2FA tools), and regularly audit which features you have enabled.
A security scan is like a quick blood test—it checks for surface-level issues like known malware signatures, blacklisted URLs, or outdated plugins with known CVEs. Scanners like Sucuri SiteCheck or WPScan are great at catching common problems, especially when viewed from an external perspective.
A full security audit, however, goes much deeper. It includes reviewing server configurations, checking raw logs for suspicious activity, verifying file integrity, auditing user roles and permissions, testing 2FA and login protection, scanning for exposed version numbers, and more. It also includes environmental checks like Cloudflare configuration, PHP hardening, and staging site vulnerabilities.
In short: a scan tells you what might be wrong, but an audit tells you what is vulnerable, how bad it is, and how to fix it. If you’re serious about protecting your site, don’t just scan, audit regularly as well.
To get the WordPress security hardening checklist, just join our free Discord and ask for it.
It’s a small community of SEO and AI professionals where we share tips, strategies, and help each other out. No charge, no email sign-up, and nothing shady. It’s just an easier way to manage requests and connect with others doing real work.
WPSec.com – Is WordPress Secure?
Securing your WordPress site isn’t about achieving perfect, impenetrable security — that doesn’t exist. The goal is to make sure you’re not the low-hanging fruit. Most attacks aren’t personal; they’re automated scans looking for the easiest targets, and if your site has obvious weaknesses, it will end up on that list.
By working through the steps in this guide — from locking down your hosting and server, to hardening your WordPress dashboard, tightening plugin and theme hygiene, adding advanced protections like security headers, and staying proactive with monitoring — you’re building a layered defense that turns most attackers away before they even bother. The result? A site that’s harder to breach, more resilient, and even better optimized for speed and SEO.
Use this guide as your roadmap, revisit it regularly, and treat it as a living resource for implementing ongoing security best practices that evolve with the threat landscape. The small, consistent actions you take now will save you far bigger headaches later.
At Norzer, we don’t just secure WordPress sites—we help small businesses grow. From airtight website protection to Local SEO and AI-powered lead generation, our strategies are built to expand your digital footprint and drive real revenue. No bloated agency pricing. No fluff. Just results. Reach out anytime!